[youtube]http://youtu.be/Idil5wuI33U[/youtube]
Anyone that has purchased a T300 or TX racing wheel by Thrustmaster know that the pedals leave a lot to be desired. I’ve always said that if it had a progressive brake, they would make for a decent set of pedals. Sure they’re missing a clutch, but the other two pedals do a decent job for you. I have for you a DIY Thrustmaster TX and T300 RS Brake pedal mod for $10.
This is a quick, cheap and easy mod to your T300 or TX brake pedal to add some progression for to help you hit your marks more consistently under braking. Our forums are such a great place to find mods like this and and I’d like to thank ashasha for sharing this one with us.
First thing you need to do is source the parts. I have included links to Lowes Home Improvement and Amazon for the parts that you need below. I got the Waxman 4 pack felt pads (that are actually rubber) at Lowes Home Improvement and I got the small rubber feet from Ace hardware. I was hoping that I could find both at either place, but it wasn’t the case. I also needed some super glue and will tell you why in a bit.


So the Waxman felt pads were $5.40, the rubber feet were $2.60 and you can get some super glue for about $2.99 . The parts come to $8.00 and you may have some super glue already laying around your house. I have included the links to Lowes and Amazon below
Ashasha drew his inspiration from the conical brake mod on the Thrusmaster TP3A pedals and tried a few different options before coming up with this mod.
Quick disclaimer though before I go over his instructions. I reversed things to work for me, so watch the entire video above, or read everything below before you get to work on your pedals. His version could work for you, but I had an issue with it.
Here’s how you do it.. The tools you need are a pair of scissors and a needle nose pliers. I used a regular pair of scissors and they worked great.


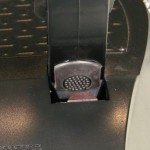
Step #1, cut about 1/16″ inch on opposite sides and then another 1/2″ off one of the other sides so that it wasn’t sticking out. Or you can cut a 1/4″ inch from the top and bottom so it’s more squared which is what I did. It should look square on the part that you can see and should be flush with the top of the base. The goal is to have the little nubs be the center point for the rubber foot.
Step # 2 Use one of the rubber feet and stick that to the back of the pedal arm aligning it so that it meets the center of the furniture gripper. He used a pair of needle nose pliers to hold it in position and then pressed the pedal down and to seat it. Mash it a couple of times to make sure that the adhesive takes and you are done.

Now, I tried it this way and the rubber foot started sliding up the pedal arm. Maybe Ashashas rubber foot had better adhesive or since I was driving the BMW Z4 GT3 car in iRacing with antilock brakes, I may have been mashing harder on the pedal. I decided to try something different by reversing things. I put the rubber foot on the base and the furniture gripper on the arm. That worked for a bit until the rubber portion of the furniture gripper started separating from the foam part that has the adhesive on it.

So I separated the foam and luckily my wife had some super glue so I didn’t have to go back to the store. I decided to attach the rubber to the back of the pedal arm with it .. VOILA ! That was it.. Worked like a charm.. I have to say, it makes these pedals definitely worthy of some hardcore racing and makes you more consistant under braking. As I mentioned, I ran the BMW GT3 car and I was at Daytona to see if I could run similar lap times to what I ran during the 24 hours race I ran earlier this month and I was right on pace. I do like the T3PA conical brake mod better, but.. For about $10, this is a great alternative. You also get 1028 steps of resolution which is more than a G27 or Fanatec wheel with pedals attached..

Another great thing about this mod is that you have extra pieces in case they wear out, or have issues with the adhesive they come with. You can also split it up with a friend. Before you run out to your local hardware store, check that you have some super glue to make sure the furniture gripper stays put.
Thanks to Ashasha for sharing this idea with us in our forums. If you have any questions about it, ask in that thread or here in the comment section below and I’ll get to it as soon as possible.
ashasha forum thread: http://bit.ly/1EpP6bM
Lowes Furniture Grippers: http://low.es/1EpPnLJ
Amazon Rubber Feet: http://amzn.to/17sIxYO
Purchase a Thrustmaster T300 RS here: http://amzn.to/1wmByWK
Purchase a Thrustmaster TX here: http://amzn.to/1uhmvjY
Purchase a Thrustmaster T500 RS here: http://amzn.to/1GzcHqP
Purchase a Thrustmaster TH8A Shifter here: http://amzn.to/1vWT2sn
Purchase a Thrustmaster TH8RS Shifter here: http://amzn.to/10GoqD0
That’s a pretty good idea. Thanks for posting. As you know, the TX pedals are, umm, crap. The brake pedal is advertised as being “progressive” but it’s really not. It’s just slightly stiffer than the gas pedal.
You’re certainly right about the T3PA pedals. I’ve had my T3PA pedals on order since Christmas day and still don’t have them yet (they’re telling me mid-March, now).
What I ended up doing in the meantime was, I bought an adapter from Ricmotech to run my G27 pedals with my Thrustmaster TX wheel (works flawlessly). The pedals are un-modded but they’re still better than the stock pedals that come with the TX. But, either way, mid-March can’t come soon enough.
But, I’m tempted to give this idea a try with the TX pedals. Heck, it might even be better than the G27’s.
I wonder if you could cut some basher t500 bushing to fit in there…making the bracket to hold them in and attaching it should be pretty simple..or just CA them to the back wall?
This is definitely worth the effort. I have the T3PA pedals and the rubber brake stop feels better than the previous load cell pedals that I owned which were much more expensive.
If anyone has left over components please contact me these exact components are not available in the uk happy to do PayPal for a reasonable price.
I think I may have figured out something even simpler – I have been using it for a while.
Pictures attached below –
1. Get a squash ball (double yellow – stiffer)
2. Cut the ball in four pieces.
3. Wedge in between the brake pedal and the stand.
You’re done! No glue is required, because the motion of the pedal keeps the ball fragment wedged in the space.
Please let me know what you think.
Thank you for this solution, i’ll try with this ball. Yes because the standard brake is ridicolous.
Let me know if it worked out well for you 🙂
It was better, but then i put there a yoga blok rubber and it looks good.
I dont understand why thrustmaster dont use a serious springs for pedals.. i spend a lot of money for this, it’s incredibile to use it with the rubber of a yoga blok or a squash ball.. what a strange engineers they have? 😉
Messaging you here as well as youtube just in case. I want to do you mod, but don’t understand how to cut the squash ball. The pic you have looks like you’ve jammed the entire ball in the gap, but you say to cut in four pieces?